
Water is one of the most persistent and destructive forces a property owner will ever have to contend with. While a sudden, dramatic ceiling collapse during a massive thunderstorm immediately grabs your attention, the vast majority of water-related property damage occurs far more subtly. A single cracked flashing boot, a shifted shingle, or a compromised valley can allow rainwater to drip silently into your attic insulation and structural framing for several months before a single visible stain appears on your living room drywall. This slow, hidden intrusion quietly weakens the structural integrity of your home while creating a toxic internal environment.
Overcoming this double-headed challenge demands an absolute commitment to a logical, structural blueprint. You cannot afford to deploy superficial, reactive, quick fixes that only address half of the problem. Successfully restoring your property requires a comprehensive strategy that moves from emergency exterior source containment to meticulous interior environmental decontamination and insurance management. This in-depth guide provides you with a practical, step-by-step roadmap to eliminate active leaks, evaluate underlying framing rot, safely remove internal biological hazards, and restore your home to a pristine condition.
Initiating Immediate Emergency Source Control

Track the Path of Water Intrusion and Patch the Exterior Shell
The absolute first priority when discovering interior moisture damage is to stop the active flow of water at its source. Every hour you delay structural containment allows additional gallons of water to saturate your ceiling assemblies, spreading the contamination footprint and driving up your final repair costs. However, finding the exact point of entry from inside a living room is notoriously difficult. Water rarely drops straight down through a ceiling; instead, it enters through a high point on the roof, runs down the slope of your plywood decking, travels along a horizontal rafter truss, and finally drops onto your ceiling drywall several feet away from the initial breach.
To locate the source safely, grab a flashlight and carefully access your attic space during a rainstorm or immediately after one concludes. Look for the telltale signs of active tracking, such as shimmering wet wood studs, dripping water lines, or damp, compressed patches of blown-in fiberglass insulation. If you must inspect the roof from the outside, check the high-risk vulnerability points, such as the sheet metal flashing around chimneys, the rubber boots surrounding plumbing vent pipes, and the interlocking valleys where two distinct roof slopes converge.
While a temporary heavy plastic tarp can offer short-term protection during an active storm cycle, you must quickly coordinate permanent repairs to repair a leaky roof before structural wood rot sets into your rafters. Patching a localized failure requires cutting away compromised shingles, replacing water-logged underlayment sheets, and weaving in fresh architectural shingles to re-establish a seamless water-shedding boundary. Navigating the complexities of modern residential roofing requires understanding how different materials, underlayments, and ventilation systems interact to shield your home, ensuring that your quick emergency fixes transition smoothly into long-lasting structural solutions.
- Immediate action steps to contain an active interior ceiling leak:
- Place a heavy plastic bucket or containment bin directly beneath the active ceiling drip to catch water.
- Move valuable furniture, electronics, rugs, and personal items completely out of the affected room.
- Locate the exact center of the visible ceiling water blister and puncture it carefully with a small screwdriver to drain trapped water safely, preventing a sudden drywall collapse.
- Take clear, timestamped photographs of both the interior ceiling damage and the corresponding exterior roof layout for your records.
Assessing Exterior Structural Damage and Sourcing Estimates
Consult With Credentialed Builders to Evaluate System Lifespans
Once the immediate emergency is temporarily stabilized, you must step back and evaluate the overall condition of your roof system. If your shingles are more than twenty years old, or if you notice widespread curling, clawing, and severe granule loss across multiple slopes, a localized patch will not provide long-term security. Widespread shingle degradation means the entire protective envelope has reached the end of its functional lifespan, and patching one leak today simply delays the next inevitable breakdown a few weeks down the road.
Evaluating your home’s structural shell requires bringing in qualified exterior specialists to conduct an in-depth diagnostic assessment. A reputable company will provide a comprehensive, transparent roof estimate that details the cost of plywood deck replacement, underlayment, and new flashing kits. This itemized bid should clearly spell out the cost of labor, disposal fees for tearing off old materials, and the specific wind and impact warranties attached to the new shingle profiles, allowing you to build an accurate budget for the project.
During this evaluation, take the time to explore modern material upgrades that can insulate your home from future weather anomalies. For homeowners seeking ultimate weather protection, upgrading to a standing seam metal roof completely eliminates exposed screws and prevents future leaks. This premium architectural profile utilizes concealed interlocking metal fasteners that sit safely beneath the metal panels, protecting the structural screws from direct exposure to rain, wind, and solar heat. While a premium metal system requires a higher initial financial investment than basic asphalt shingles, its exceptional durability and resistance to leaks make it an incredibly smart choice for long-term property protection.
Choosing and Vetting Your Exterior Construction Partners

Verify Licensing, Insurance, and Manufacturer Certifications
The longevity of a new roof installation depends entirely on the skill and precision of the technicians executing the project on your roof deck. Even if you purchase the highest-grade architectural shingles or premium metal panels, the system will fail prematurely if the flashing is installed poorly or the underlayment is laid down unevenly. Unfortunately, the residential construction market is frequently targeted by unverified, uninsured contractors who look to maximize their profits by cutting critical installation corners.
To protect your household from low-quality craftsmanship and legal liabilities, you must put every prospective contractor through a rigorous screening process. Verify that the company maintains a physical, local office address, holds active state-issued builder licenses, and carries robust general liability and workers’ compensation insurance policies. Partnering with a local, factory-certified roofing contractor guarantees that your labor warranty will be backed directly by the material manufacturer. This elite credential confirms that the installation crew has undergone advanced factory training, ensuring that every valley, drip edge, and ridge vent is built to the highest trade standards.
If your attic inspection uncovers extensive structural soft spots, a simple overlay is out of the question. Investing in a full roof replacement service is often the most cost-effective path if your underlying plywood decking has suffered widespread water saturation. A comprehensive tear-off project allows the crew to strip the home down to its raw wooden skeleton, identify and replace rotted plywood sheets, and install heavy-duty self-healing ice and water shields along the eaves and valleys, ensuring your home is fully weatherproofed against future climate extremes.
- Key verification questions to ask an exterior builder before signing a contract:
- Can you provide active copies of your general liability and workers’ compensation insurance certificates?
- Will your crew strip away all existing layers of old roofing down to the raw wood deck before installing new materials?
- Do you utilize sub-contracted crews, or are the technicians direct, W-2 employees of your firm?
- What specific manufacturer certifications do you hold that will allow you to offer extended structural warranties?
Identifying Internal Environmental and Microbial Hazards
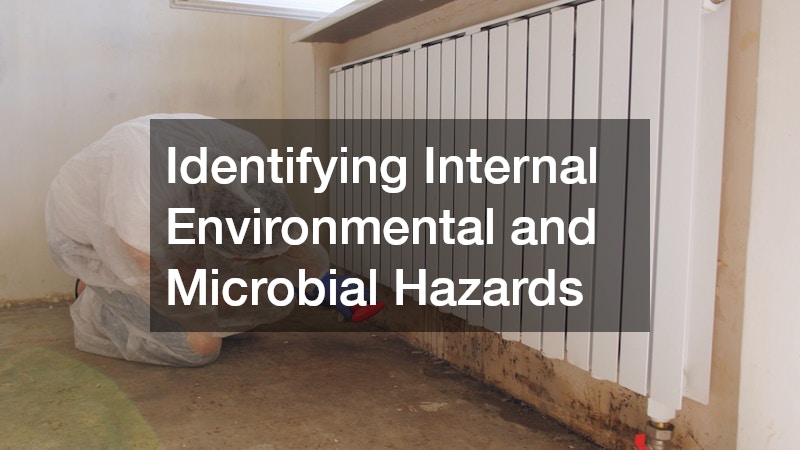
Test Enclosed Attic Spaces and Drywall Cavities for Hidden Toxic Growth
While securing the exterior shell of your property protects you from future storms, your restoration work is only half complete if you ignore the environmental damage inside your walls. When water drips through an attic floor, it creates a dark, stagnant, and highly humid environment inside your ceiling cavities. If these enclosed spaces remain damp for more than forty-eight hours, dormant mold spores will activate, forming expansive colonies that release hazardous mycotoxins directly into your indoor breathing air.
Microbial contamination can grow entirely out of sight, thriving on the back surfaces of your plasterboard, inside your fiberglass insulation batts, and along your structural wooden framing studs. If a ceiling leak has gone unnoticed all winter, scheduling a professional black mold inspection is critical to ensure your indoor air quality is safe for children and pets. Certified environmental inspectors will utilize specialized infrared moisture cameras, digital moisture probes, and ambient air sampling canisters to locate hidden pockets of active growth and measure the concentration of airborne spores inside your living areas.
Attempting to resolve a major mold infestation as a DIY project using retail cleaning sprays is incredibly dangerous. Agitating a dry mold colony causes it to release millions of microscopic spores into the air, which can easily travel through your central HVAC ductwork to contaminate every single room in your home. A certified mold removal company uses specialized containment barriers and HEPA air scrubbers to neutralize spores without contaminating neighboring rooms. These remediation experts establish negative air pressure zones inside the workspace, ensuring that any airborne particles are pulled through industrial filtration systems rather than escaping into your family’s primary living spaces.
Executing Comprehensive Environmental Remediation and Restoration
Deploy Specialized Mitigation Protocols to Sterilize Affected Structural Timbers
The physical process of completely removing biological contamination from an interior space requires following strict environmental protocols. Many traditional cleaning methods, such as spraying household chlorine bleach onto porous wooden studs, are completely ineffective. Bleach consists primarily of water; while the chemical chlorine component flashes off the surface quickly, the water content sinks deep into the porous wood grain, feeding the deep root structures of the fungus and causing it to grow back aggressively within a few weeks.
True structural restoration requires the physical removal of all deeply saturated, porous building materials that cannot be safely salvaged. This means carefully cutting away water-logged insulation, bagging contaminated drywall panels in airtight containment sacks, and exposing the underlying wooden framing timbers. Relying on specialized mold elimination services ensures that underlying structural framing studs are physically sanded and treated with antimicrobial sealants. Technicians use advanced media blasting techniques or specialized HEPA vacuum sanders to strip away the fungal roots, followed by the application of commercial-grade fungicides that kill lingering spores and protect the wood from future moisture damage.
As you finalize the environmental remediation phase, you must meticulously document every single treatment step to secure your financial standing. Documenting every step of the remediation process provides your insurance company with the objective evidence required to approve your indoor property damage claim. Collect high-resolution before-and-after photographs, keep a copy of the inspector’s laboratory air sample reports, and secure itemized receipts from your certified mitigation team. This thorough documentation proves that the property was returned to a verified safe baseline, protecting your home’s equity and future marketability.
- The standard phase profile of professional environmental remediation:
- The construction of airtight plastic containment chambers around the affected rooms.
- Continuous operation of industrial HEPA air scrubbers to eliminate airborne fungal particles.
- Safe extraction and disposal of all ruined, water-saturated drywall, baseboards, and insulation.
- Mechanical sanding of structural wood frames followed by an application of antimicrobial sealants.
- Independent clearance air sampling to verify the space is fully safe for reconstruction.
Restoring Interior Infrastructure and Rebuilding Safely
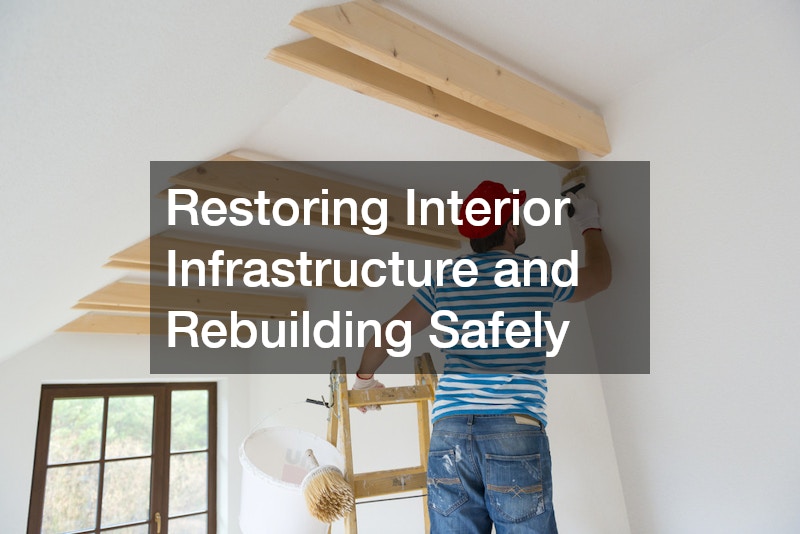
Implement Modern Waterproof Materials and Verify Complete Mechanical Sealing
Once your roof is fully waterproofed and your interior framing has been professionally sterilized, you can finally transition from containment and remediation into the final reconstruction phase. Rebuilding your living spaces offers a fantastic opportunity to implement smart, moisture-resistant building upgrades that can safeguard your home from future water intrusion events. Rather than simply replacing your old materials with the exact same builder-grade options, look to integrate modern structural components designed to handle high-humidity environments.
When hanging new ceiling and wall assemblies, choose fiber-reinforced, moisture-resistant drywall panels rather than standard cellulose-faced boards, especially in high-risk zones beneath roof valleys or inside master bathrooms. These modern panels utilize specialized fiberglass mats that offer zero food source for opportunistic fungal spores, preventing a minor future leak from turning into a major biological hazard. Furthermore, before closing up your wall cavities with fresh drywall, verify that your internal mechanical systems—such as your attic HVAC condensation pans, exhaust ducts, and plumbing vent seals—are completely airtight and insulated to prevent seasonal condensation drops from dripping onto your new ceilings.
To finish the reconstruction phase beautifully, complete your interior wall upgrades with high-quality, mold-resistant paint primers and premium topcoats. These specialized finishes contain built-in antimicrobial agents that actively repel surface moisture and prevent atmospheric mold from taking root on your clean walls. Combine these material upgrades with an automated indoor humidity management plan, using whole-home dehumidifiers or smart bath exhaust fans to keep your home’s relative humidity level consistently below fifty percent.
Conclusion
Overcoming the hidden devastation of an unexpected roof leak requires a strategic, multi-disciplinary approach that refuses to cut corners on safety. By taking immediate action to identify water tracking pathways and repair active exterior structural failures, you protect your home’s wooden core from progressive wood rot. Securing comprehensive project estimates and partnering with licensed, factory-certified exterior builders ensures that your roof updates comply fully with modern safety standards, whether you choose durable architectural shingles or a premium standing seam metal profile.

